amibroker

HomeKnowledge Base

How to create custom import definition for ASCII importer

When we use File->Import ASCII to import data, we can choose import file format using one pre-defined import format definitions. As it is explained in the manual (http://www.amibroker.com/guide/d_ascii.html) it is also possible to create our custom import definitions to match data we are trying to import. This article explains all the required steps.

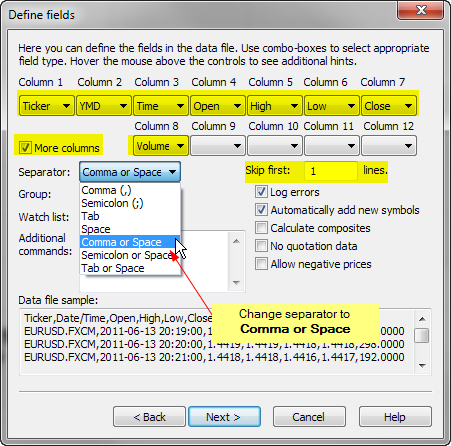
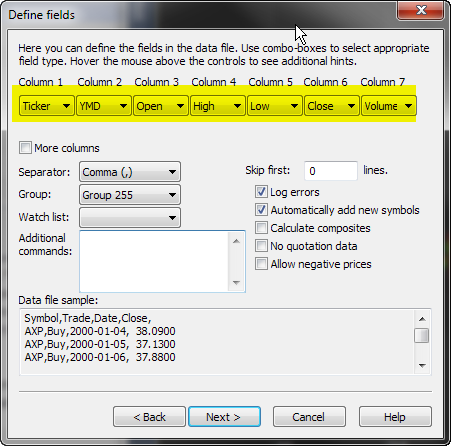
The easiest method to create import definition is to use File->Import Wizard. In the first page, select at least one file in the format we want to import and on the second page configure columns:

Import Wizard page 2

This all easy when we are importing quotation data, but when we are importing non-quotation data such as category assignments, we can not select appropriate columns using Import Wizard. In such case we need to type-in appropriate $FORMAT command in the “Additional commands” field of Import Wizard.

For example if we have file with categories like this:

"DDD","3D Systems Corporation","Technology","Computer Software: Prepackaged Software",1
"MMM","3M Company","Health Care","Medical/Dental Instruments",1
"WBAI","500.com Limited","Consumer Services","Services-Misc. Amusement & Recreation",1
"WUBA","58.com Inc.","Technology","Computer Software: Programming, Data Processing",1
"AHC","A.H. Belo Corporation","Consumer Services","Newspapers/Magazines",1
"ATEN","A10 Networks, Inc.","Technology","Computer Communications Equipment",1
"AIR","AAR Corp.","Capital Goods","Aerospace",1
"AAN","Aaron's,  Inc.","Technology","Diversified Commercial Services",1

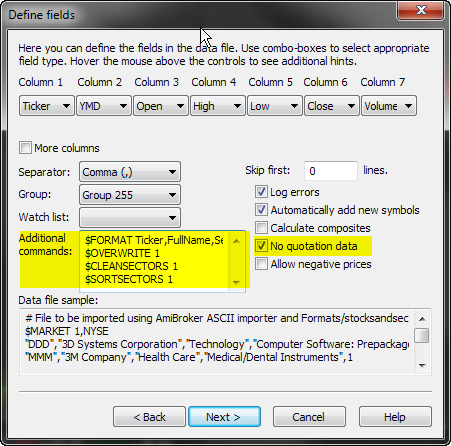
We need to add the following commands in the “Additional commands” field of Import Wizard

$FORMAT Ticker,FullName,SectorName,IndustryName,Group
$OVERWRITE 1
$CLEANSECTORS 1
$SORTSECTORS 1

First line tells AmiBroker the column meaning, second line tells it to overwrite existing data. Last two lines tell AmiBroker to wipe existing category structure and sort imported sectors alphabetically. Be sure NOT to specify $CLEANSECTORS command when you do NOT want to wipe existing category structure.

We also need to mark “No quotation data” box in the second page of Import wizard to tell AmiBroker that the file that we are importing does not contain quotes and it should switch off all price checking.

Import Wizard page 2

Finally, in the last step of the wizard save the format definition:

Import Wizard page 3

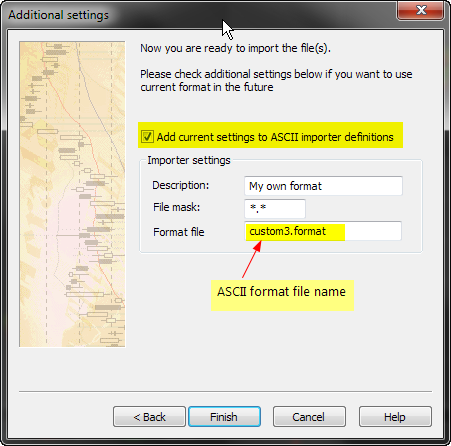
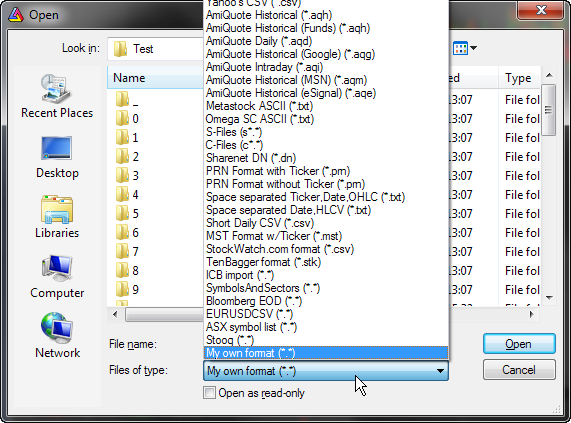
Once we do this, next time we use File->Import ASCII a new selection My own format will appear in the Files of type combo box in the file selector dialog.

Import ASCII

It is worth noting that import definitions are plain text files that are stored in “Formats” subfolder of AmiBroker directory, and the list of available import definitions that appears in “Files of type” combo box, is also a plain text file called “import.types” that is located in the same subfolder. So, advanced users may also modify those files directly using plain text editor such as Notepad. It is all explained in great detail in the manual http://www.amibroker.com/guide/d_ascii.html

How to combine multiple databases into one

In order to combine data stored in two separate databases within a single database we may consider one of the following options:

ASCII IMPORT/EXPORT METHOD

First of the possible ways is to export data from one database into CSV files using the procedure presented here:

http://www.amibroker.com/kb/2006/03/04/how-to-export-quotations-from-amibroker-to-csv-file/

Once we have our quotations exported into text files, we can load the other database and use built in ASCII importer to import data. The detailed procedure is outlined in the following Knowledge Base Article:

http://www.amibroker.com/kb/2014/12/29/importing-data-using-multiple-column-separators/

FILE COPY METHOD

Another way of combining the databases is to copy the individual symbols files. Each database stores individual data files within 0-9,a-z,”_” subfolders and it is possible to copy the individual data files between databases. When copying, we need to maintain the same folder pattern and copy symbols from “a” subfolder of one database into “a” subfolder of the other database (the same for other folders), so each of the symbols would land in its respective folder.

After we copy the data files, we also need to delete broker.master file from the target database folder. This is because this file stores pre-generated symbol list used for fast loading. When we delete the file, it will be reconstructed based on information from individual data files.

More information about the database structure can be found in the manual:
http://www.amibroker.com/guide/h_workspace.html

How to categorize symbols coming from Metastock databases

Many data vendors that deliver data in MetaStock database format offer quotes in separate MS databases organized in several folders, separate for different markets or industries.

AmiBroker does not have any symbol limits, there is no need to maintain separate databases in AB and all the quotes can be placed in a single database. The configuration process of Metastock database as external data source is described here: http://www.amibroker.com/guide/h_extsources.html

AmiBroker supports internally many ways to categorise symbols into groups, markets, sectors, industries, etc. To learn more about categories available in AmiBroker please check this: http://www.amibroker.com/guide/h_categories.html

Now we may want to bring MS folder structure into AmiBroker’s category system. Sometimes data vendor would prepare appropriate automation scripts to do that work for us, but when they are not available, we can arrange the categories ourselves in the initial setup process.

To do so, we could pick the folders one-by-one, then reassign the symbols to desired categories. The process is the following:

First we configure the database:

  • Select File->New->Database menu
  • Enter the folder name and press Create
  • Choose MetaStock plugin as the datasource
  • Press Configure

MS plugin config

Now we pick single MetaStock folder (AmiBroker allows to import them all at once, however we want to avoid mixing the symbols from various folders) and press Retrieve button.

MS plugin config

After pressing Retrieve we can close the database configuration dialog (OK, then OK again), go to Symbol->Organize Assignments and reassign the newly imported symbols from Undefined market or Industry into our desired location.

MS plugin config

Now we can return to File->Database Settings->Configure, retrieve another folder and repeat the assignment for that folder and so on and so on.

It is important to mention that this is just one-time procedure. After it is done, AmiBroker will automatically read all updates directly from MetaStock files.

There are also data-vendors offering data in MS format (such as PremiumData for example) that deliver ready-to-use configuration scripts – in such case it would allow to avoid such manual setup procedure and synchronize all category assignments automatically.

“Invalid symbol” message for stocks traded on multiple exchanges (IB)

Some of the symbols available from Interactive Brokers data-feed may be traded on multiple exchanges. In such case, when we enter the symbol to the database as:

INTC
GLD
CSCO

then we may see “Invalid symbol” message displayed by the Interactive Brokers plugin, as symbol SMART-STK-USD default format is not enough to uniquely identify the symbol. Therefore we would need to specify the primary exchange for the given symbol.

The primary exchange can be specified in the symbol using -!EXCHANGE suffix, so we can write the symbol like this

INTC-!NASDAQ

and it will instruct Interactive Brokers plugin to send NASDAQ as Primary Exchange for INTC to TWS.

We can however maintain similar ticker naming for all symbols in our database and use short names for all US symbols. To make it possible there is special dictionary (or translation table) for IB symbols that both plugin and IB automated trading interface use. In AmiBroker main folder there is a IBDictionary.txt file, which we can edit with any plain text editor (like Notepad) and provide symbol translations. It describes how symbols are translated before plugin communicates with TWS API.

The format of this file is CSV (comma separated values):

InputSymbol,OutputSymbol, comment (optional)

For example:

INTC,INTC-!NASDAQ, This is because INTC is now traded on multiple exchanges, so we need to set primary exchange
CSCO,CSCO-!NASDAQ, The same as above 
MSFT,MSFT-!NASDAQ
GLD,GLD-!ARCA

Deleting symbols with comma in the name

When importing symbols into the database, we may sometimes encounter situations, when as a result of user-mistake we import erroneous ticker names into our database. This may for example happen when we specify an incorrect column separator in ASCII importer (or use incorrect import definition that does not match the imported file) or when we use input file that contains commas when importing watchlist members using Symbol->Watchlist->Import.

As a result – we may end up with a ticker list like this:

Problematic symbols

In this case marking the symbols in Symbols window and using Delete option from the context menu will not work, because AmiBroker treats the comma as a separator between symbols.

To solve the problem – with relatively few tickers we can always just open Symbol->Information window and fix the names in there. However – with a larger group of symbols it will not be very practical.

In such case, in order to delete the incorrect symbols from the database – we can use Symbol->Organize Assignments window, mark the tickers in left-hand-side panel and press Delete to remove these symbols.

Removing problematic symbols

There is also a way to delete the symbols manually from the database folder by removing respective data-files. This requires the following steps:

  1. Exit AmiBroker
  2. go to respective subfolder of the database folder (in Windows Explorer)
  3. delete data-files for the particular symbols
  4. delete broker.master file from the database folder (it stores the symbol list)
  5. restart AmiBroker and load the database

Timestamps explained

When AmiBroker is fed with the data, say 1-minute data, it can create all other time intervals by compressing source data on-the-fly. So if you display say 13-minute chart, AmiBroker takes source 1-minute data and builds 13-minute blocks of data to create 13-minute bars. For this process to work correctly, source data need to have timestamps that point to the START of each bar interval. So with 1-minute data, the bar that has a timestamp 9:30:00 is supposed to cover trades from the period of 9:30:00.000 upto 9:30:59.999. All our data plugins provide data in that format.

Now, provided that we have say 1-minute data, AmiBroker can compress data to any other N-minute interval. When doing so, it can assign timestamps to compressed bars in different ways. This can be controlled through Tools->Preferences->Intraday dialog.

Timestamps

Let us check it on an example of a 5-minute bar based on input 1-minute quotes for e-mini contract.

Timestamps

As explained in the manual (http://www.amibroker.com/guide/w_preferences.html) – there are four choices available:

  1. Time of FIRST tick inside bar – when selected the bar gets the time stamp of the very first trade inside given time slot (bar). With this choice the bar will be stamped with 9:30:00 because this is the first tick (quote) available within that 5-min period
  2. Time of the LAST tick inside bar – when selected the bar gets the time stamp of the very last trade inside given time slot (bar). In this case the bar will be stamped with 9:34:00 because this is the last quote available within that 5-min period
  3. START time of the interval – when selected the bar is time-stamped with start time of the time slot (bar). The bar will be stamped with 9:30:00 because that is a beginning of the selected time period.
    NOTE: This is recommended and the default setting as it provides consistency with how source bars are timestamped. It should not be changed unless you have really good reason to do so.

  4. END time of the interval – when selected the bar is time-stamped with start time of the time slot (bar). The bar will be stamped with 9:34:59 timestamp, because that’s the very end of this 5-min period.

There is also an additional setting available (Override: Weekly/monthly bars use day of last trade), which allow to modify the behaviour in case of Weekly/Monhtly bars, no matter what is the main setting we use. This allows us to e.g. use START time of interval to identify intraday quotes, however – on a weekly chart display e.g. Wednesday date (if that is most recent day in current week) or Friday date for complete weeks.

We need to remember that the timestamps identify the whole bar and all trades within that bar, so if we use START time of interval for time-stamping, in the backtest use Close array for as BuyPrice and 5-minute periodicity, then in our report we will see:

Timestamps

So, we see the time 9:30:00, but this bar refers to trading activity from period 9:30:00-9:34:59 and the actual price is read from the tick being the Close of the whole 5-minute period (at 9:34:00 in the table above).

For the same reason – when we use weekly data for backtesting, we trade at Open, but for time-stamps we use Override box (so weekly bars are stamped with the data of the last day within given week) – then in the report we will see e.g. Friday dates because of the fact that we use such approach to time-stamp bars. This does not really mean that trade happened on Friday, but only that we use Friday date to identify the whole Monday-to-Friday week.

FastTrack data configuration and troubleshooting

General configuration process for FastTrack datasource is explained in the manual:
http://www.amibroker.com/guide/h_extsources.html

Sometimes however, after the configuration process the FastTrack data source is still missing from the list of sources in File->Database Settings. If that happens, please follow the steps listed below to make this source available:

First you need to make sure that you are using 32-bit version of AmiBroker as FastTrack is 32-bit application and only the other 32-bit application can use its data via their API. To check what version of AmiBroker you have go to Help->About window. If you do not have proper version, please download 32-bit one from http://www.amibroker.com/download.html

Secondly you need to install FastTrack for the Web (FT4Web) program. If you are using Windows Vista, Windows 7 or Windows 8, it is good idea to first turn OFF User Access Control (down to “Never notify”). The following video shows the process:
http://windows.microsoft.com/en-US/windows7/Turn-User-Account-Control-on-or-off. Then install FastTrack for the web (FT4Web) program.

If the FastTrack datasource is still missing from the data source combo in Database Settings, then it is necessary to check if:

  1. FT.DLL is inside “AmiBroker/Plugins” folder
  2. FastTrack.DLL file is installed by FT4Web inside Windows folder

If it can not be found in the Windows folder, we need to make sure that FastTrack for the web is installed, then perform a search for FastTrack.DLL file using Windows Explorer file search.

Once the FastTrack.DLL file is found, we need to copy it to AmiBroker main folder – then FastTrack datasource should then become available in AmiBroker.

Importing data using multiple column separators

When we import data from ASCII (plain text) files, sometimes the data in the input files are arranged in columns separated by different characters. This article shows how to configure Import Wizard / ASCII Importer to import such data correctly.

Let us consider data file using the following format

Ticker,Date/Time,Open,High,Low,Close,Volume
EURUSD,2011-06-13 20:19:00,1.4421,1.4421,1.4419,1.4419,332
EURUSD,2011-06-13 20:20:00,1.4419,1.4419,1.4418,1.4418,298
EURUSD,2011-06-13 20:21:00,1.4418,1.4418,1.4416,1.4417,192

In this sample data file columns are separated with a comma, with one exception – date and time columns are combined together, with a space in between. ASCII importer requires us to specify Date and Time columns separately. Fortunately – there is a way to treat space and comma both as separators at the same time.

To configure Import Wizard, we need to specify columns to match the input data, treating Date and Time as two separate columns (Column 2 and Column 3 in this case), additionally we need to set Separator field as Comma or Space, so the importer would properly recognize space as a character delimiting the new column.

Import Wizard

This way our data will be imported properly. There are also other multiple separator choices available in the Import Wizard, such as Tab or Space and Semicolon or Space that can be used if your data file uses tabs or semicolons as primary column separator.

If we build our import definition file manually for ASCII importer, we can also specify multiple separators, by enclosing the required characters in quotation marks in $SEPARATOR command. The equivalent format definition for the above input data would look like this:

$FORMAT Ticker, Date_YMD, Time, Open, High, Low, Close, Volume
$SKIPLINES 1
$SEPARATOR ", "
$CONT 1
$GROUP 255
$AUTOADD 1
$DEBUG 1

More information about ASCII importer and Import Wizard functionalities can be found in the manual:
http://www.amibroker.com/guide/w_impwizard.html
http://www.amibroker.com/guide/d_ascii.html

How to find correct symbol for Interactive Brokers data

Sometimes Interactive Brokers symbology may be difficult to figure out. It is however very easy to find out proper symbol using Contract Description window in the TWS.

The general format for symbols that AmiBroker uses to access Interactive Brokers’ data is:

SYMBOL-EXCHANGE-TYPE-CURRENCY

The symbols must be entered in UPPER case. CURRENCY may be skipped if it is USD. TYPE can be skipped if it is STK (stock). EXCHANGE can be skipped if it is SMART.

To find correct symbol using TWS follow these steps:

  1. Select desired symbol in TWS
  2. Click on the line with right mouse button and select Contract Info->Description menu

    TWS Contract Description menu

  3. Now read the values from the Description window and use them to build proper symbol for IB plugin

    TWS Contract Description window

As per rules mentioned above, if CURRENCY is USD it may be skipped so we can use either ESZ4-GLOBEX-FUT-USD or ESZ4-GLOBEX-FUT.

For non-US symbols the procedure is the same, so TESCO PLC would be TSCO-SMART-STK-GBP. In this case we can not skip SMART and STK because we need to specify currency, and it is 4th part of the symbol. If we skipped SMART and STK, IB plugin would think that GBP is second part of dash delimited string and interpret it as exchange, and this is NOT what we want.

How to correct forward looking timestamps

Some platforms, like Tradestation, use “future looking” timestamps in their data so for example 5 minute bar covering market activity from 9:30:00 till 9:34:59 is stamped with 9:35:00 (future time – see Tradestation manual explaining their timestamps) so their data have a kind of future offset.

AmiBroker, on the other hand, uses and expects natural timestamping, in which data from 9:30 are marked with 9:30 timestamp, so data from 9:30:00 until 9.34:59 belong to 9:30 5-minute bar.

If you want to use future-timestamped data in AmiBroker you need to remove the offset.

To do so, you need to shift the timestamps back by the amount equal to the base data interval during import process. In case of 5-minute bars, you need to shift data by -5 minutes.

To shift the data during import you can use $TIMESHIFT command of ASCII importer, see http://www.amibroker.com/guide/d_ascii.html

$TIMESHIFT offset_in_hours

the offset_in_hours parameter defines the time in hours that should be added to imported timestamps. You can use negative and fractional values too. Each minute is 1/60 of hour so shifting back by 1-minute would be -0.01666667.

If you are using ASCII Importer Wizard, and want to import 5-minute data with future looking timestamps, you can simply type the following in the “Additional commands” box of ASCII Importer Wizard.

$TIMESHIFT -0.08333333333333

-0.08333333 is a result of dividing 5 by 60 (number of minutes in an hour)

Please find out what time-stamping method is used by your data provider because it is important to know that to get your higher-interval charts right.

Next Page »