amibroker

HomeKnowledge Base

How generate backtest statistics from a list of historical trades stored in a file
Apart from testing mechanical rules based on indicator readings, backtester can also be used to generate all statistics based on a list of pre-defined trades, list of our real trades from the past or a list of trades generated from another software.

To achieve that, first we need to create an input information for AmiBroker where it could read the trades from. A convenient way would be to use an input file in text format, which could store information about trades, including the type of transaction (buy or sell), dates and position sizes. A sample input file may look like this:
Symbol,Trade,Date,Price,Shares
AAME,Buy,2000-04-06,2.66,375.94
AAME,Buy,2000-04-10,2.66,378.922
AAPL,Buy,2000-04-27,31.23,32.0862
AAON,Buy,2000-04-06,3.19,313.48
ABAX,Buy,2000-04-26,7.67,132.101
AB,Buy,2000-04-25,20.23,50.0337
A,Buy,2000-04-27,84.66,11.8362
AAME,Buy,2000-05-10,2.6,373.627
ABCB,Buy,2000-05-11,6.08,159.406
A,Buy,2000-05-15,82.27,11.736
AAON,Buy,2000-05-18,3.84,246.242
AB,Buy,2000-05-15,20.84,46.3303
ABAX,Buy,2000-05-18,5.84,161.913
ABCB,Buy,2000-05-15,6.08,158.803
AAME,Buy,2000-05-19,2.6,363.763
AB,Buy,2000-06-05,22.78,43.3501
ABC,Buy,2000-05-18,4.49,210.595

We can read and backtest such input with the formula presented below. It is important to remember that this particular code can work with input files of identical format (columns in identical order, signals specified with exact Buy / Sell words, position sizes specified as shares). Changing the input format would also require to update the formula to match the input.

Path to the file is specified in the very first line (note that double backslashes need to be used).

The formula reads the file line by line, then on a bar with matching date/time it generates a new Buy or Sell signal that is then combined with existing signals (coming from other bars).

file "C:\\TEMP\\trades.csv"// change this to real location of your data file
dt DateTime();
//
// Initialize variables
Buy Sell possize 0;
//
fh fopenfile"r" );
//
if( fh )
 {
     while( ! 
feoffh ) )
     {
         
line fgetsfh );
         
// get the ticker symbol from the file
         
sym StrExtractline);
         
// if ticker matches current symbol
         
if ( Name() == sym )
         {
             
// extract data from line of text
             
trade StrExtractline);
             
trade_datetime StrToDateTimeStrExtractline) );
             
price StrToNumStrExtractline) );
             
shares StrToNumStrExtractline) );
             
//
             
if ( trade == "Buy" )
             {
                 
newbuy dt == trade_datetime;
                 
Buy Buy OR newbuy// combine previous buy signals with new
                 
BuyPrice IIfnewbuypriceBuyPrice );
                 
possize IIfnewbuysharespossize );
             }
             
//
             
if ( trade == "Sell" )
             {
                 
newsell dt == trade_datetime;
                 
Sell Sell OR newsell// combine previous sell signals with new
                 
SellPrice IIfnewsellpriceSellPrice );
             }
         }
     }
     
//
     
fclosefh );
 }
 else
 {
     
Error"ERROR: file can not be open" );
 }
//
SetPositionSizepossizespsShares )

Debugging techniques – Part 1 – Exploration

From time to time people send us their formulas asking what happens in their own code. Or they do not know why given trade is taken or not. These questions are usually caused by the fact that people lack the insight what is happening inside and what values values their variables hold.

The first general-purpose debugging technique is using Exploration.

You need to add several AddColumn statements and run your code as Exploration, so you can actually see the values of all variables. This will reveal whenever you really have values that you expect and would make it easier for you to understand what is happening inside your code.

In simplest form add this code to your system formula:

Filter 1// show all bars
AddColumnBuy"Buy" )

and it will show you if you are getting expected values in Buy array. You can use the same technique to track the content of any variable. Add as many columns as you want. You would be surprised how much insight into your own code you will get.

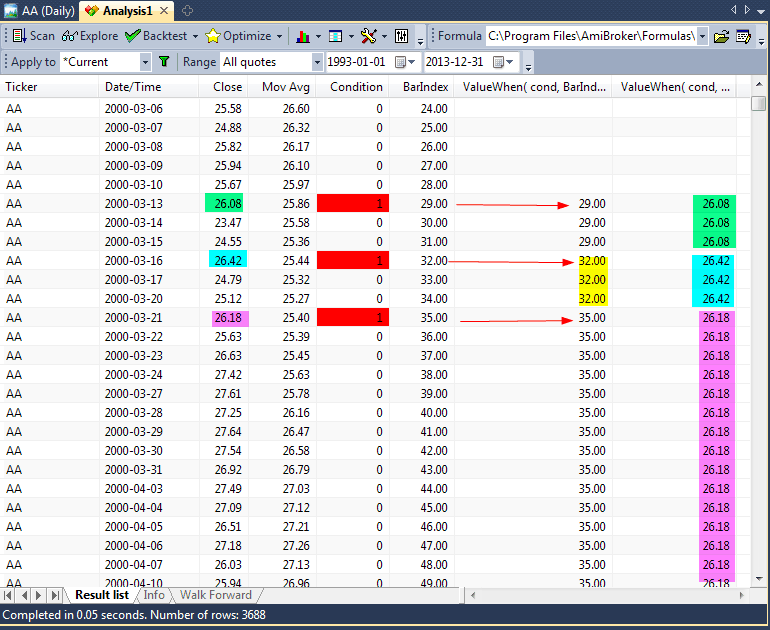
You can use Exploration to learn how particular function works, for example, if you don’t understand how ValueWhen works, you can display its results this way:

Filter 1// show all bars
//
MAC10 );
cond CrossC);
bi BarIndex();
//
AddColumnC"Close" );
AddColumnm"Mov Avg" );
AddColumncond"Condition");
AddColumnbi"BarIndex" );
AddColumnValueWhencondbi ), "ValueWhen( cond, BarIndex() )" );
AddColumnValueWhencondClose), "ValueWhen( cond, Close )" )

If you run above code you will clearly see how ValueWhen picks the value when condition is true and “holds” it for all other bars (when condition is false).

Debug using Exploration

Once you get this level of insight into your code you will be better equipped to fix any errors.
Exploration is number one choice in getting detailed view on what is happening inside your code.

For more information about Exploration see http://www.amibroker.com/guide/h_exploration.html

How to create your own code snippet

AmiBroker 5.84 (released today) offers users an easy way to create their own code snippets. Code snippet is a small piece of re-usable AFL code. AmiBroker comes with lots of pre-defined snippets. You can learn more about built-in snippets here.

But now you can add your own! And it is fairly easy using new Code Snippet window. Code Snippets window is available in new AFL editor (in floating frame mode). It can be shown/hidden using Window menu.

To create your own snippet, do the following:

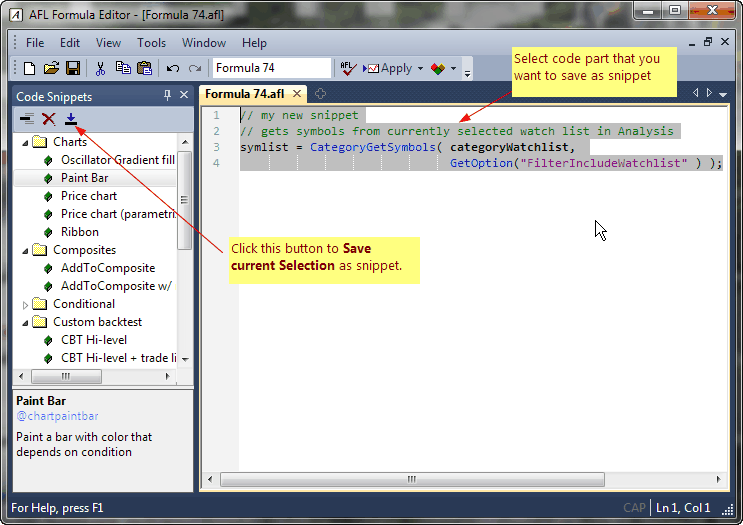
  1. type the code you want
  2. select (mark) the code you want to place in a snippet
  3. press Save selection as snippet button in the Code Snippets window

Code Snippets 1

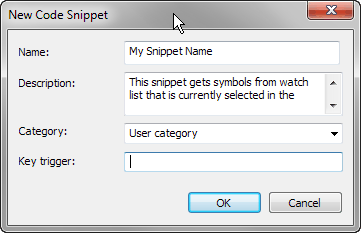
If you do the steps above the following dialog will appear:

Code Snippets 2

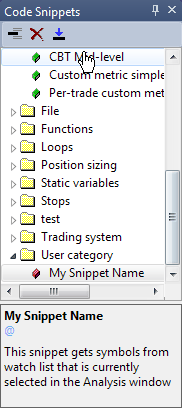
Now you need to enter the Name of the snippet, the Description and Category. Category can be selected from already existing items (using drop down box), or new category name can be typed in the category field. Key trigger field is optional and contains snippet auto-complete trigger (to be implemented later). Once you enter all fields and press OK, your new snippet will appear in the list.

Code Snippets 3

From then on you can use your own snippet the same way as existing snippets. Perhaps most convenient method is using drag-drop from the list to AFL editor.

As you may have noticed user-defined snippets are marked with red color box in the Code Snippets list. Only user-defined snippets can be overwritten and/or deleted. To overwrite existing user-defined snippet, simply follow the steps above and give existing name. AmiBroker will ask then if you want to overwrite existing snippet. To delete a snippet, select the snippet you want to delete from the list and press Delete (X) button in the Code Snippet window.

Closing trades in delisted symbols

When we perform historical tests on databases that contain delisted symbols – we may encounter a situation, where there are open positions in those tickers remaining till the very end of the backtest, distorting the results (as these open positions will reduce remaining maximum open positions limit for the other symbols).

Here is an easy technique which allows to force closing positions in those symbols on the very last bar traded for given symbol. The code below just adds an additional Sell signal on the last available bar in the database for this symbol:

bi BarIndex();
exitLastBar bi == LastValuebi );
Sell /*your regular sell rules*/ OR exitLastBar

If we are using 1-bar trade delays in our backtesting settings, then the exit signal would need to be triggered one bar in advance (so the delayed signal could still be traded on the last bar) and the code would look like this:

SetTradeDelays(1,1,1,1);
bi BarIndex();
exitLastBar bi == LastValuebi );
Sell /*your regular sell rules*/ OR exitLastBar

There is also a dedicated field in Symbol->Information window which allows to store the delisting date directly in the database. AmiBroker allows to read that field from AFL code using GetFnData() function. If we have this field populated for delisted symbols for our symbols, then the code forcing exits on delisting date would be:

exitLastBar datetime() >= GetFnData("DelistingDate");
Sell /*your regular sell rules*/ OR exitLastBar

What is important, this approach would work also, when Pad and Align to reference symbol feature is used in Analysis window settings.

In order to populate Delisting Date field in the database, we can enter the dates manually through Symbol->Information window or use ASCII importer to import the information from the input text files. More details about ASCII importing can be found at:
http://www.amibroker.com/guide/d_ascii.html

How to import huge ASCII files quickly

From time to time we are asked how to import large text (ASCII) files quickly. Normally speed is non-issue for ASCII import as it is blazing fast. That kind of question typically comes from person who wants to import hundreds of megabytes of data.

ASCII importer is optimized for adding new data to the existing database, so the most efficient operation is adding current quote (the newest one).

If you want to import huge amount of data in ASCII format in most efficient manner you need to make sure that the file you are importing is sorted

  1. in ascending symbol order (so “AAPL” before “INTC”), and within symbol
  2. in ascending chronological order (so oldest records first, newest records last)

In SQL query talk it would be “ORDER BY Symbol ASC, Date ASC”.

Doing so ensures that no sorting is required during import and symbol shuffling is reduced to minimum, so in-memory cache is used most efficiently.

If your file is not ordered or ordered in reverse then it takes long to import because AB must shuffle data. In worst case scenario (newest records first), every data insert involves sorting which makes it a killer. The difference can be hours vs seconds on properly sorted file.

Can I encrypt my formula so no-one can decipher it?

Currently the only way to protect your code from other peoples’ eyes is to translate part of the formula (such as few functions) or entire formula to C/C++ language and compile as AFL plugin DLL. Doing so requires some C/C++ programming knowledge, a C/C++ compiler (free Visual Studio Express or GNU tools can be used) and AmiBroker Development Kit (ADK).

ADK contains instructions how to write your own AFL plugin along with code samples that are ready-to-compile. Some C/C++ knowledge is required though.

ADK is freely downloadable from
http://www.amibroker.com/bin/ADK.exe (self-extracing exe)
or
http://www.amibroker.com/bin/ADK.zip (zip archive)

NOTE: ADK is not for the beginners. It is for programmers (i.e. for people who already wrote some C/C++ code in their life). We are working on providing alternative methods for non-programmers.

Why can’t I change the symbol? (Symbol lock)

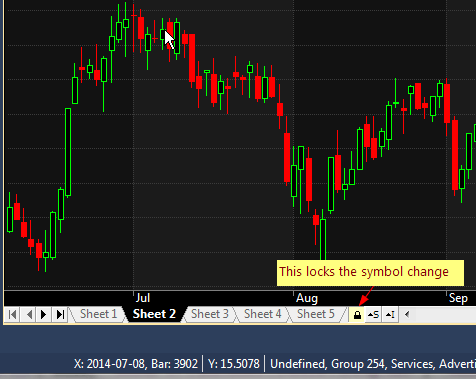
If you can not change the active symbol for the chart, chances are that you have accidentally clicked “Symbol Lock” icon (a small padlock) located near the scroll bar.

Symbol Lock

When it is activated (yellow) then AmiBroker will prevent any symbol changes for active chart window. To toggle lock simply press the padlock icon.

How to identify signal that triggered entry/exit if multiple signals are used

When designing a trading system we often need to quickly identify which of the rules used in the code triggered the particular Buy or Sell signal. Here are some techniques that may be useful in such identification.

For the purpose of this demonstration let us use a sample formula, where the Buy signal may be triggered by one of three independent rules:

Buy1 CrossMACD(), Signal() );
Buy2 CrossCloseMA(Close50) );
Buy3 CrossRSI(), 30 );
//
Buy buy1 OR Buy2 OR Buy3

To determine which of those three rules generates the entry signal, we can either visualize signals in the chart or use Exploration feature of the Analysis window.

In case a custom chart is used, we can do the following:

  1. display the signal in custom chart title
  2. use PlotShapes function to indicate certain buy rule
  3. use PlotText to add pre-defined text labels.

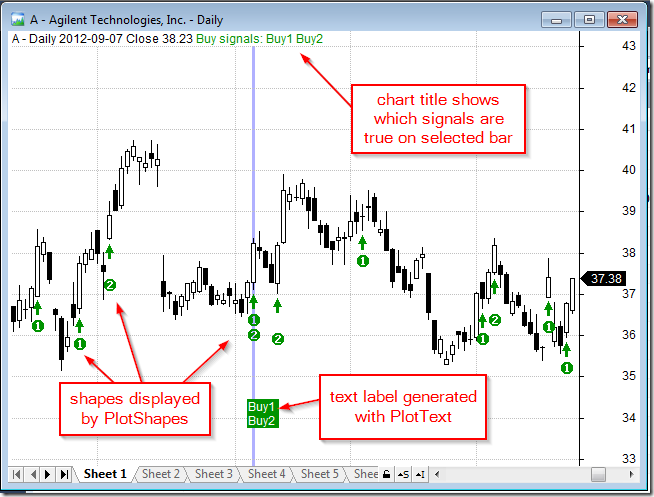
The formula below shows sample implementations of these three techniques. This is actually one of many ways that can be used for coding such custom output:

Buy1 CrossMACD(), Signal() );
Buy2 CrossCloseMA(Close,50) );
Buy3 CrossRSI(), 30 );
//
Buy buy1 OR Buy2 OR Buy3;
//
// Standard price plot
PlotClose"Close"colorBlackstyleCandle);
//
// Custom title definition
BuyReason EncodeColor(colorGreen ) + WriteIf(Buy,"Buy signals: ","")
           + 
WriteIf(buy1"Buy1 """) +WriteIf(buy2"Buy2""")
           + 
WriteIf(buy3"Buy3""");
Title StrFormat"{{NAME}} - {{INTERVAL}} {{DATE}} Close %g ",Close ) +BuyReason;
//
// Plotshapes function calls
PlotShapes(Buy*shapeUpArrowcolorGreen0Low);
PlotShapes(Buy1*shapedigit1colorGreen0Low,-30);
PlotShapes(Buy2*shapedigit2colorGreen0Low,-45);
PlotShapes(Buy3*shapedigit3colorGreen0Low,-60);
//
//
// Custom text labels displayed with PlotText
if( SelectedValue(Buy) )
{
   
SelectedValueBarIndex() );
   
maxy Status("axismaxy");
   
miny Status("axisminy");
   
0.15 * (maxy miny) + miny;
   
text WriteIf(buy1], "\nBuy1 """)
          +  
WriteIf(buy2], "\nBuy2 """)
          +  
WriteIf(buy3], "\nBuy3 """);
   
PlotTexttexti,  ycolorWhitecolorGreen );

The chart below shows how to use signal visualization technique implemented in the formula.

Chart Example 1

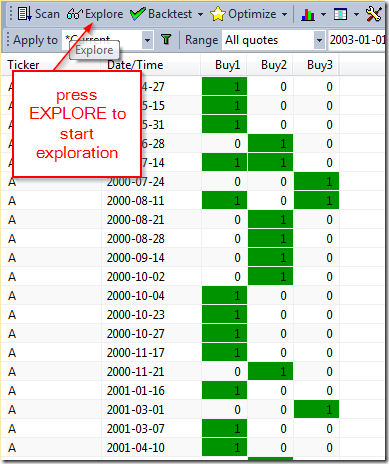
The other method is to use the Exploration feature of Analysis window that allows to generate tabular output, where we can display the values of selected variables. The detailed tutorial explaining this feature is available at:
http://www.amibroker.com/guide/h_exploration.html

For the discussed purpose of tracking the signals that triggered entry or exit, we can add the following code to our trading system to show the values of each Buy1, Buy2, Buy3 variables:

Filter Buy;
AddColumnBuy1"Buy1"1colorDefaultIIfBuy1colorGreencolorDefault ) );
AddColumnBuy2"Buy2"1colorDefaultIIfBuy2colorGreencolorDefault ) );
AddColumnBuy3"Buy3"1colorDefaultIIfBuy3colorGreencolorDefault ) )

Exploration Signal tracking

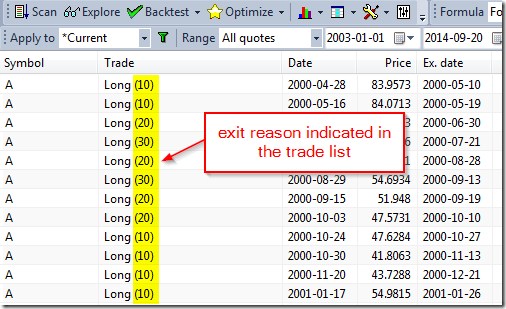
With regard to exit signals they can be visualized in a similar way as shown above, but there is also an additional functionality in the backtester, which allows to indicate the exit condition directly in the trade list. This can be done by assigning values higher than 1 (but not more than 127) to Sell variable.

Sell1 CrossSignal(), MACD() );
sell2 CrossMA(Close50), Close );
Sell Sell1 10 Sell2 20

The above expression will result in assigning value of 10 to Sell variable for the bars where Sell1 is true, 20 for the bars where Sell2 is true and 30 for the bars where both conditions are true.

These values will be indicated in the trade list:

Backtest exit signal tracking

It is worth to mention that values 1 to 9 are reserved for built-in stops and used internally by the backtester, and have special meaning:

  1. normal exit
  2. maximum loss stop
  3. profit target stop
  4. trailing stop
  5. n-bar stop
  6. ruin stop (losing 99.96% of entry value)
  7. reserved
  8. reserved
  9. reserved

Note also that you must not assign value greater than 127 to Sell or Cover variable. If you assign bigger value it will be truncated.

This is further discussed here: http://www.amibroker.com/guide/afl/equity.html

Make icons larger on high DPI displays

When running AmiBroker on high-DPI displays like Retina screens, 4K screens or small tablets with hi-res displays the toolbar icons may become so small that they are difficult to use.

To solve the problem you need to choose Tools->Customize menu to display Customize dialog, go to Options tab and
select Large Icons check box as shown in the picture below.

Options page, Large Icons

Do NOT use “registry cleaners” to avoid problems

Every now and then a user contacts support saying that some functionality (like OLE interface) stopped working and after some e-mail exchange it turns out that the culprit was a “Registry Cleaner” program that was run and deleted some vital registry entries.

I already warned users NOT to use “registry cleaners” or “memory turbo” here:
http://www.amibroker.com/guide/x_performance.html

These programs are written pretty much often by amateurs and they often blindly delete registry entries that they assume are “no longer used”. First off, there is no freaking way a 3rd party program can ever determine when a registry key is “unused”. It was evidently put there for a reason and could have been accessed hundreds or thousands of times. “Registry cleaners” usually make assumptions that are simply not valid. For example, they may check for the presence of file referenced by the registry key, but they silently ignore the fact that the file may be on removable media (such as USB disk) and that Windows may change drive letters when new drive is inserted. In such cases “registry cleaner” would delete perfectly valid registry key causing problems with the software that was using this key.

AmiBroker can live with most of its registry entries deleted (you would lose all your UI customizations though) with one exception: OLE. AmiBroker exposes OLE automation server (Broker.Application) and if 3rd party “registry cleaner” wipes its registry keys, the OLE would stop working. This affects also auto-import feature in AmiQuote as it relies on AmiBroker’s OLE automation server.

So bottom line is: To avoid problems DO NOT USE “registry cleaners”.

More evidence of problems caused by “registry cleaners” can be found here:

  1. Why I don’t use registry cleaners

  2. Are registry cleaners safe to use?
  3. Registry cleaner won’t speed up your PC

Now, what to do if you already run registry cleaner and have problems?
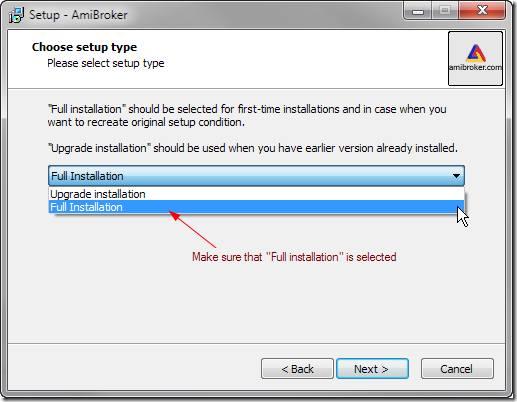
The solution is to use full setup again. You do NOT need to uninstall anything, you don’t need to delete anything. Just run the setup again over existing installation, with “Full Installation” option selected as shown in the picture below:

Full setup

That should cure the problem with OLE within seconds. Good luck!

Next Page »